
Get the Look: Sin City Collection
The new Pulp Riot paint is better than ever
You’re invited to recreate the campaign looks.
Split Personality
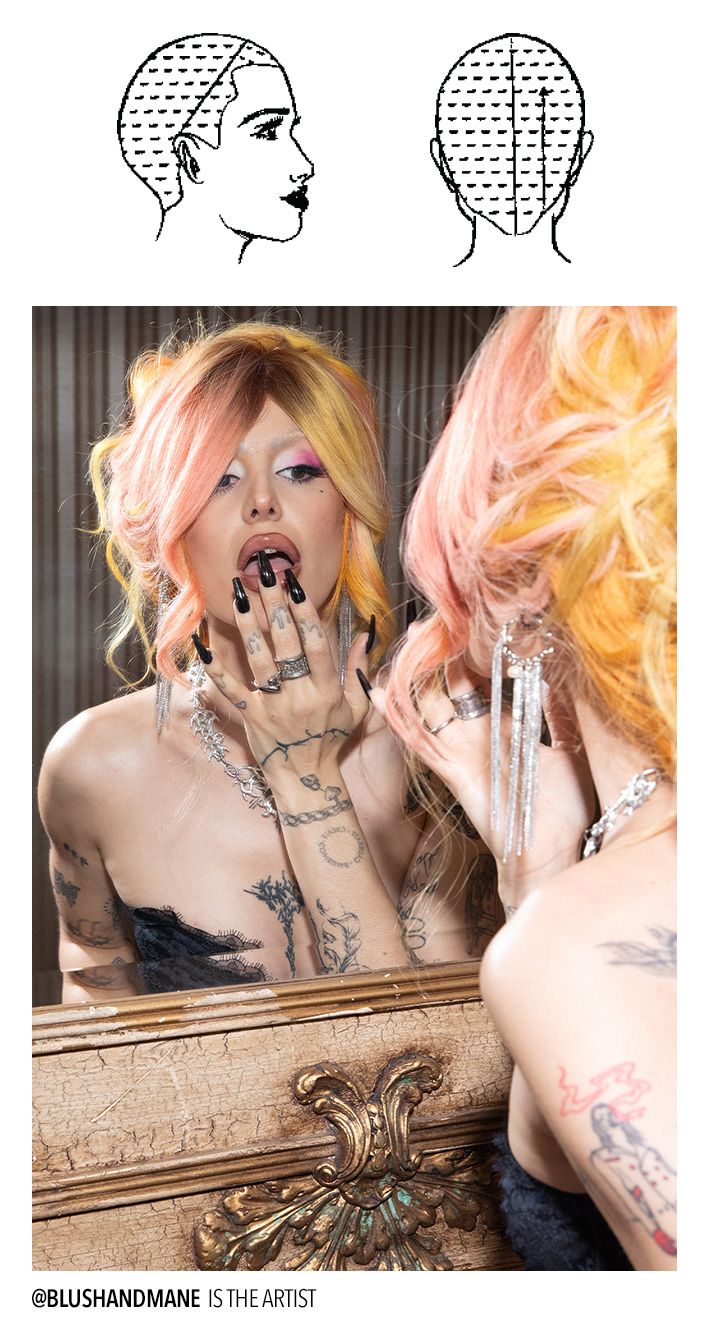
To achieve this look, hair must be lightened to a level 9 -10.
Create a profile and radial parting to separate the hair into four sections while taking horizontal subsections. Start at the mid-lengths to ends, and apply #BlondeAF with 20 vol, process up to 45 minutes. Once desired result is achieved, rinse then apply #BlondeAF with 20 vol to the roots and process up to 40 minutes.
*If hair integrity is not compromised, another application of lightener can be applied to achieve an even lighter end result.
COLOR APPLICATION
Create a profile and radial parting, separating the hair into four sections. Take a parting in the fringe area and paint the left side with Eloped and the right side with Desert Canyon. Create a mixture of Desert Canyon and Vintage Vegas using equal parts of both colors. Apply the color mixture to the remaining sections of hair in the back portion of the head.
STYLING
Create a profile and radial parting, separating the hair into four sections. Take a 1” inch curling iron and curl the fringe area, secure with Velcro rollers to hold style and create volume. Once secured with rollers, curl the remaining hair away from the face. Use bobby pins to secure the hair by gathering the hair at the crown and twist the hair while securing it into place with pins. Allow loose curls to lay softly on top of the head to create an effortless, romantic updo. Undo rollers from fringe area and finesse hair until desired result is reached.
FINISHING TOUCHES
Mist with a medium hold working spray to complete the look.
Luxe Waves
To achieve this look, hair must be lightened to a level 9 -10.
Create a profile and radial parting to separate the hair into four sections while taking horizontal subsections. Start at the mid-lengths to ends, and apply #BlondeAF with 20 vol, process up to 45 minutes. Once desired result is achieved rinse then apply #BlondeAF with 20 vol to the roots and process up to 40 minutes.
*If hair integrity is not compromised, another application of lightener can be applied to achieve an even lighter end result.
COLOR APPLICATION
Create a profile and radial parting, separating the hair into four sections. Using Ghostblood and Eloped, alternate between the two shades down the hair strand creating a negative space that will make Eloped pop and shine.
STYLING
Create vertical sections in the hair. Using a water bottle, styling comb, and gel, begin creating “s” patterns in the vertical subsections. Create “s” patterns on the entire head. Place client under a dryer and let dry.
FINISHING TOUCHES
Mist with a medium hold working spray to complete the look.
Vintage Glam
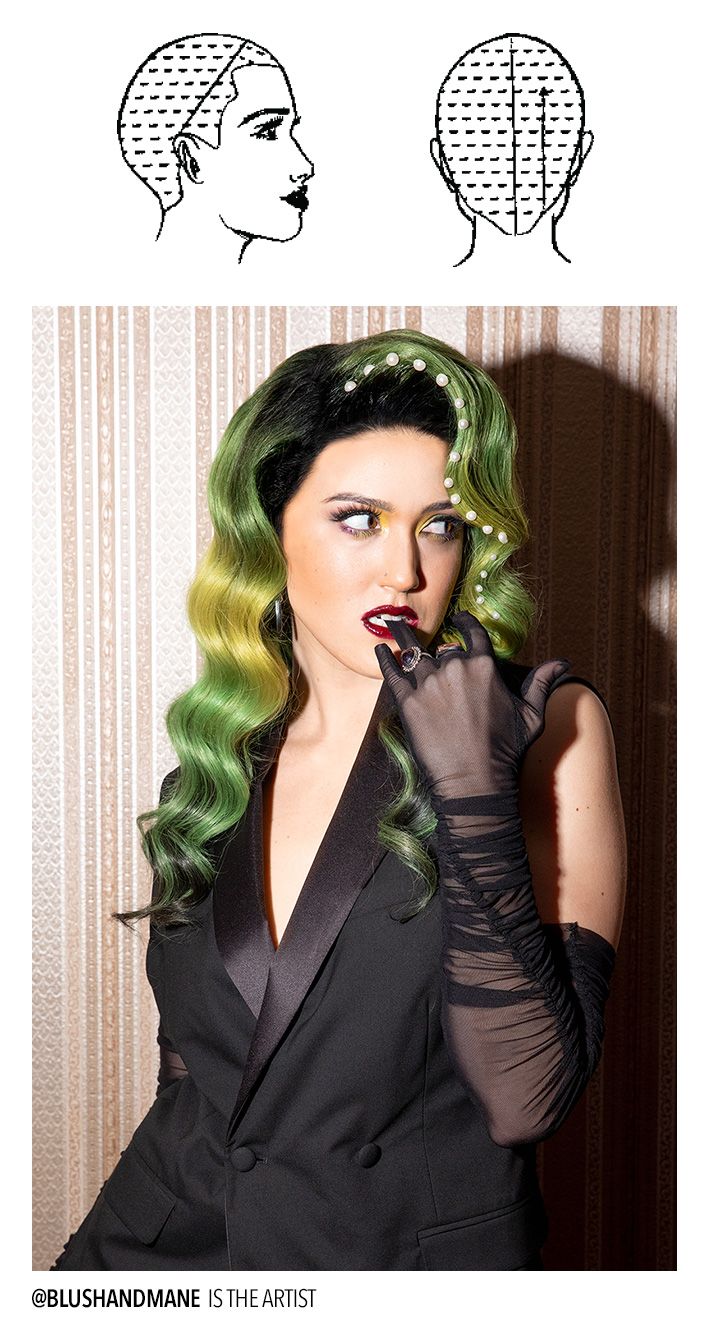
To achieve this look, hair must be lightened to a level 9 -10.
Create a profile and radial parting to separate the hair into four sections while taking horizontal subsections. Start at the mid-lengths to ends, and apply #BlondeAF with 20 vol, process up to 45 minutes. Once desired result is achieved rinse then apply #BlondeAF with 20 vol to the roots and process up to 40 minutes.
*If hair integrity is not compromised, another application of lightener can be applied to achieve an even lighter end result.
COLOR APPLICATION
Create a profile and radial parting, separating the hair into four sections. Create root formula by mixing FACTION8 5-0 with an equal ratio of FACTION8 -77 booster with 6 vol. Apply to roots in the front section of the hair. Use Snake Eyes to paint a two-inch horizontal section. Then take a mixture of 2 parts Lemon, 1 part Desert Canyon and paint another horizontal section underneath. Begin to blur/blend the two together for a seamless transition. After creating the shine line in the middle, apply Snake Eyes to the lower mid-lengths. Use the same mixture for the roots and blend that into Snake Eyes to create depth at the ends.
STYLING
FINISHING TOUCHES
After brushing out curls, use duckbill clips to create definition in the waves. Use a medium to maximum hold spray and spray product on the hairline. Comb hairline back and apply heat with blow dryer to create a lifted effect.
* To add pearls, use hair adhesive and place pearls on the edge of the curls.Star Volume

To achieve this look, hair must be lightened to a level 9 -10.
Create a profile and radial parting to separate the hair into four sections while taking horizontal subsections. Start at the mid-lengths to ends, and apply #BlondeAF with 20 vol, process up to 45 minutes. Once desired result is achieved rinse then apply #BlondeAF with 20 vol to the roots and process up to 40 minutes.
*If hair integrity is not compromised, another application of lightener can be applied to achieve an even lighter end result.
COLOR APPLICATION
Create a profile and radial parting, separating the hair into four sections. Create root formula by mixing Noir and Vintage Vegas in equal parts to create depth at the root. Create a triangle section in the fringe area and blend the root formula with Eloped. For the remaining mid-lengths and ends, blend Vintage Vegas into the root to create a seamless transition.
STYLING
To create volume and texture, use large hair “u” pins and zig- zag the hair in between the pin and fasten it close by twisting the ends of the pins together. Do this same technique for the entire head. Let the hair cool and set to ensure the style takes hold.
FINISHING TOUCHES
Once set, remove pins and use fingers to separate the hair to create texture and volume. Begin shaping the hair into a sphere using a hair pick. Once shaped, lightly mist with a hairspray. To create a perfect sphere, utilizing shears to cut unwanted strands can help add to the style.
Bardot Bombshell

To achieve this look, hair must be lightened to a level 9 -10.
Create a profile and radial parting to separate the hair into four sections while taking horizontal subsections. Start at the mid-lengths to ends, and apply #BlondeAF with 20 vol, process up to 45 minutes. Once desired result is achieved rinse then apply #BlondeAF with 20 vol to the roots and process up to 40 minutes.
*If the hair still has good integrity and is in good condition, another application of lightener can be applied to achieve an even lighter end result.
COLOR APPLICATION
Create a profile and radial parting, separating the hair into four sections. Using FACTION8 6-0 and 10 vol, create a root smudge for a natural-looking base. In the fringe section, blend the mid-lengths with Desert Canyon into Eloped. For the ends, use Velvet and blend into the mid-lengths. For the remainder of hair, apply Desert Canyon to the mid-lengths and ends.
STYLING
Using a 1” curling iron, curl entire section away from the face. Create a triangle section at the crown of the head and back comb to create volume. Lightly pin the section using bobby pins to create a vintage “beehive” look.
FINISHING TOUCHES
Lightly mist with a working spray and finesse curls to desired result.
Flat Top
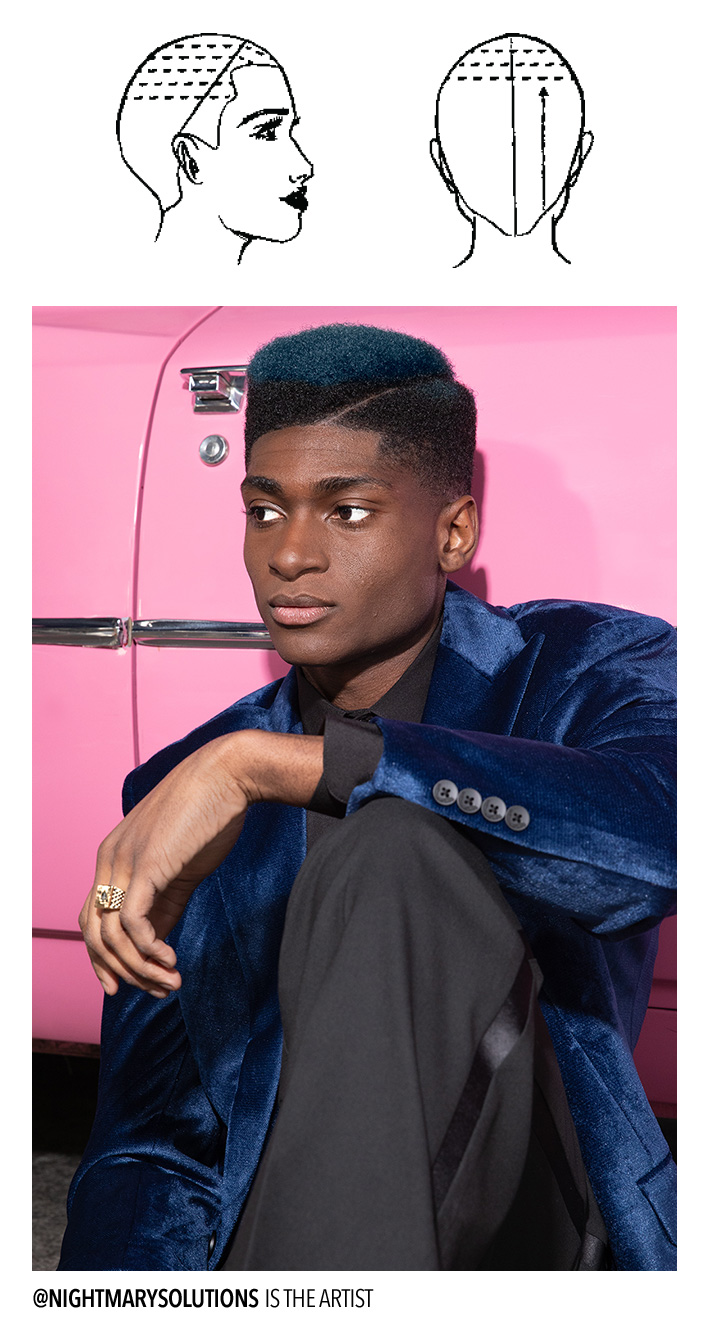
To achieve this look, hair must be lightened to a level 9 -10.
Create a profile and radial parting, separating the hair into four sections and take small horizontal subsections. Applying to the mid-lengths to ends, apply #BlondeAF with 10 vol until desired level is achieved.
*If the hair still has good integrity and is in good condition, another application of lightener can be applied to achieve an even lighter end result.
COLOR APPLICATION
Apply a toner to cancel out unwanted warm tones, and process. Once warm tones are neutralized, rinse out toner and blow dry hair. Apply Blue Tux on lightened ends and let it process for 20 minutes. Rinse out color and apply conditioner to the hair. Rinse and begin to style.
STYLING
Style hair by using a wide tooth comb. Slightly pull, then stretch out hair to create a uniform shape.
FINISHING TOUCHES
Mist with a shine spray to create a luminous effect.
GLOSSARY
PROFILE: Separates the head from left to right, center forehead to center nape.
RADIAL: Separates the head from front to back, center top of head to the top of both ears.
HORIZONTAL: Parting that is parallel to the horizon.
VERTICAL: Parting that is perpendicular to the horizon.
DIAGONAL BACK: Slanted parting that angles away from the face.
DIAGONAL FORWARD: Slanted parting that angles towards the face.
TOP CROWN: Top of the center of the head.
MID CROWN: Mid point of the top and low crown.
LOW CROWN: Central point where growth pattern begins; where the head begins to curve.
HIGH RECESSION: Center part of the head, where the profile begins.
MID RECESSION: Point where hairline tends to dip, right above the brow bone.
LOW RECESSION: Horizontal to the corner of the hair, located at the center of the sideburn.
OCCIPITAL BONE: Region of the lower back of the head, horizontal to middle of the ear.
NAPE: Lower portion of the head.
FRONTAL BONE: Approximately 2 inches away from the front of the hairline.
WEAVES & APPLICATION
PLACEMENT: 2-3 even weaves to create a bold color placement and a defined stream of color.
SLICE: A thin section of hair; can be taken in vertical, horizontal, or diagonal direction.